Linux Storage Management: LVM, RAID, and File System Optimization - Complete Guide
Linux Storage Management: LVM, RAID, and File System Optimization
Picture this: It's 2 AM, and your company's database server is running out of space. The application is critical, downtime costs thousands per minute, and you need to expand storage without taking the system offline. Or perhaps you're setting up a new development environment that needs flexible storage allocation, snapshot capabilities for testing, and redundancy for data protection.
These scenarios aren't hypothetical—they're daily realities in modern IT infrastructure. As someone who has managed storage systems ranging from small development servers to enterprise-grade database clusters, I can tell you that understanding Linux storage management is the difference between being a system administrator and being a storage architect.
Today, we'll explore the powerful trinity of Linux storage management: LVM (Logical Volume Management), RAID (Redundant Array of Independent Disks), and filesystem optimization. We'll move beyond basic partitioning to build flexible, scalable, and resilient storage solutions.
Understanding Linux Storage Architecture
The Storage Stack Journey
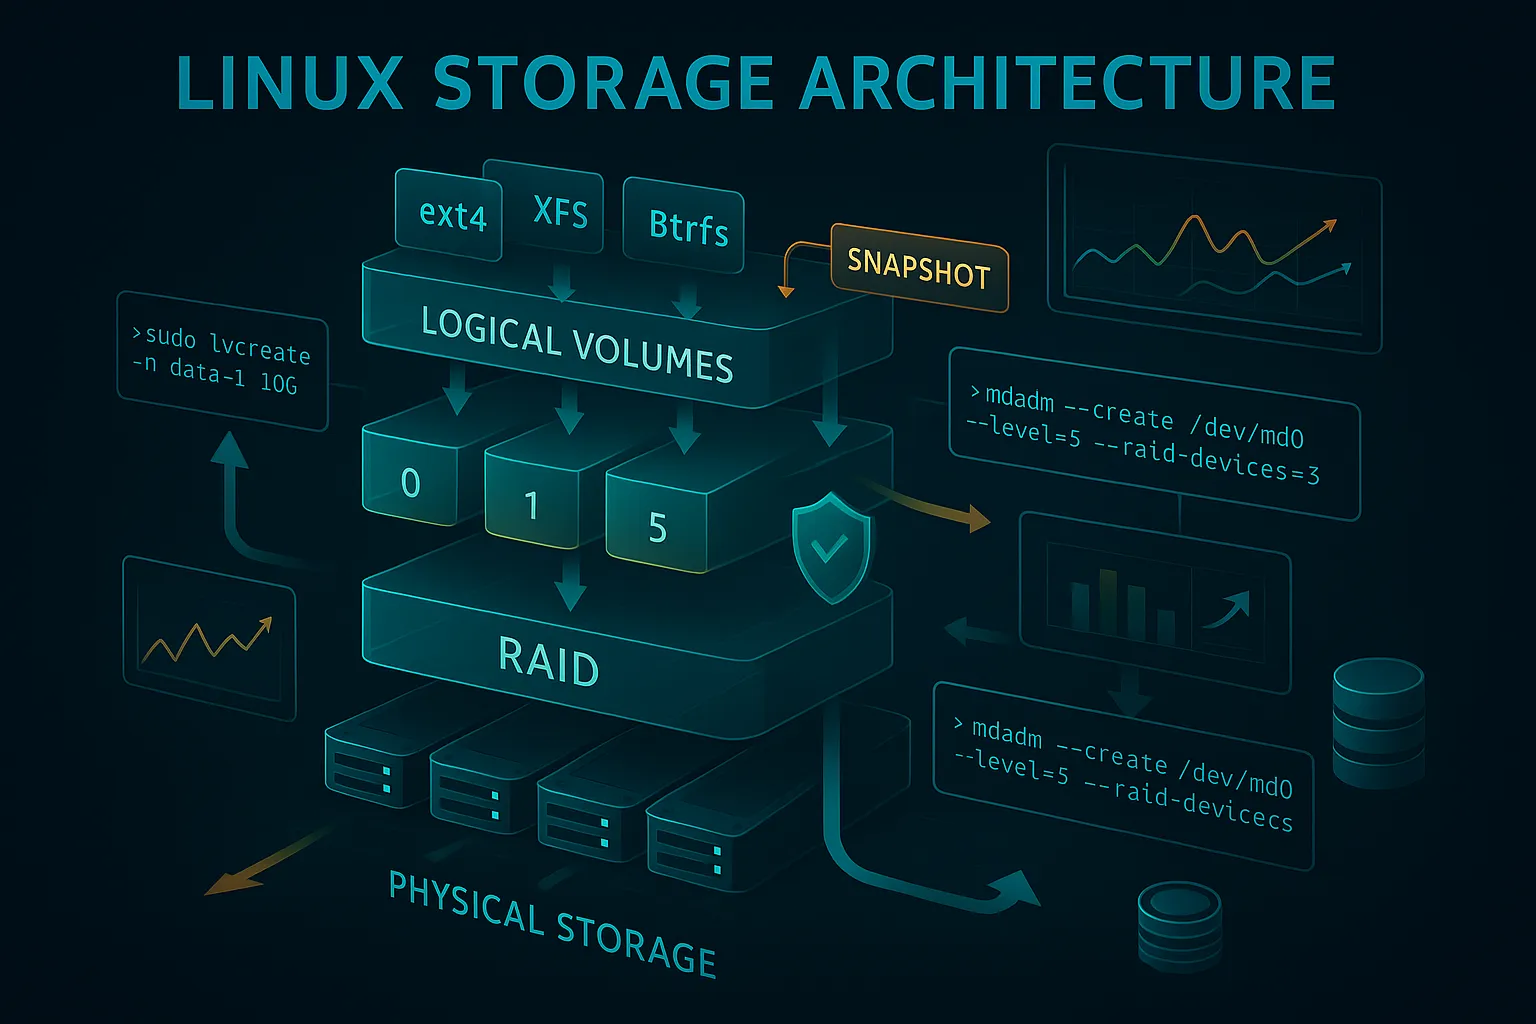
Before diving into advanced concepts, let's understand how data travels from your application to the physical disk:
Application Data
       ↓
Filesystem (ext4, xfs, btrfs)
       ↓
Logical Volume (LVM)
       ↓
RAID Layer (if configured)
       ↓
Physical Devices (/dev/sda, /dev/sdb)
       ↓
Actual Storage Hardware
Each layer adds capabilities:
Why Traditional Partitioning Falls Short
Traditional approach limitations:
# Fixed partition sizes
/dev/sda1  →  /boot     (500MB)  # Fixed forever
/dev/sda2  →  /         (20GB)   # Can't easily expand
/dev/sda3  →  /home     (50GB)   # Waste space if not used
/dev/sda4  →  /var      (10GB)   # Problems if logs grow
Problems with traditional partitioning:
LVM: The Foundation of Flexible Storage
LVM Concepts Explained
LVM creates an abstraction layer that transforms rigid disk partitions into flexible storage pools:
Physical Volumes (PV): Raw storage devices Volume Groups (VG): Pools of storage space Logical Volumes (LV): Virtual partitions you can resize
Think of it like this:
Setting Up LVM: Real-World Scenario
Scenario: Setting up a web server with separate spaces for applications, databases, and logs that can grow dynamically.
Step 1: Prepare Physical Volumes
# Check available disks
lsblk
# Example output:
# sdb     8:16   0   100G  0 disk
# sdc     8:32   0   200G  0 disk
# sdd     8:48   0   500G  0 disk

# Create physical volumes
sudo pvcreate /dev/sdb /dev/sdc /dev/sdd

# Verify PV creation
sudo pvdisplay
Step 2: Create Volume Group
# Create a volume group named 'webserver-vg'
sudo vgcreate webserver-vg /dev/sdb /dev/sdc /dev/sdd

# Check volume group
sudo vgdisplay webserver-vg
# Shows total size: ~800GB available
Step 3: Create Logical Volumes
# Create logical volumes for different purposes
sudo lvcreate -L 50G -n web-apps webserver-vg      # Web applications
sudo lvcreate -L 100G -n database webserver-vg     # Database storage
sudo lvcreate -L 30G -n logs webserver-vg          # Log files
sudo lvcreate -L 20G -n backups webserver-vg       # Local backups

# Check logical volumes
sudo lvdisplay
Step 4: Create Filesystems and Mount
# Create filesystems
sudo mkfs.ext4 /dev/webserver-vg/web-apps
sudo mkfs.xfs /dev/webserver-vg/database     # XFS for database performance
sudo mkfs.ext4 /dev/webserver-vg/logs
sudo mkfs.ext4 /dev/webserver-vg/backups

# Create mount points
sudo mkdir -p /var/www /var/lib/mysql /var/log/apps /backup

# Mount the logical volumes
sudo mount /dev/webserver-vg/web-apps /var/www
sudo mount /dev/webserver-vg/database /var/lib/mysql
sudo mount /dev/webserver-vg/logs /var/log/apps
sudo mount /dev/webserver-vg/backups /backup

# Make mounts permanent
echo '/dev/webserver-vg/web-apps /var/www ext4 defaults 0 2' >> /etc/fstab
echo '/dev/webserver-vg/database /var/lib/mysql xfs defaults 0 2' >> /etc/fstab
echo '/dev/webserver-vg/logs /var/log/apps ext4 defaults 0 2' >> /etc/fstab
echo '/dev/webserver-vg/backups /backup ext4 defaults 0 2' >> /etc/fstab
Dynamic Storage Management
Expanding Storage (Online Resizing)
Scenario: Your database is growing and needs more space.
# Check current space
df -h /var/lib/mysql

# Extend logical volume (while system is running!)
sudo lvextend -L +50G /dev/webserver-vg/database

# Resize filesystem to use new space
# For ext4:
sudo resize2fs /dev/webserver-vg/database
# For XFS:
sudo xfs_growfs /var/lib/mysql

# Verify new size
df -h /var/lib/mysql
Adding New Disks to Existing Setup
# New disk arrives: /dev/sde (1TB)
sudo pvcreate /dev/sde

# Add to existing volume group
sudo vgextend webserver-vg /dev/sde

# Now you have additional 1TB in your storage pool
sudo vgdisplay webserver-vg
LVM Snapshots: Time Machine for Your Data
Snapshots create point-in-time copies perfect for backups, testing, and rollbacks.
Creating and Using Snapshots
# Create snapshot before major database update
sudo lvcreate -L 10G -s -n database-backup-$(date +%Y%m%d) /dev/webserver-vg/database

# Perform risky database migration
mysql < risky-migration.sql

# If something goes wrong, revert to snapshot
sudo umount /var/lib/mysql
sudo lvconvert --merge /dev/webserver-vg/database-backup-20250812
sudo mount /dev/webserver-vg/database /var/lib/mysql

# If everything is fine, remove snapshot to free space
sudo lvremove /dev/webserver-vg/database-backup-20250812
Automated Snapshot Script
#!/bin/bash
# snapshot-backup.sh - Automated database snapshots

VOLUME="/dev/webserver-vg/database"
SNAPSHOT_PREFIX="db-auto-snapshot"
MAX_SNAPSHOTS=7  # Keep 7 days of snapshots

# Create new snapshot
DATE=$(date +%Y%m%d-%H%M)
SNAPSHOT_NAME="${SNAPSHOT_PREFIX}-${DATE}"

echo "Creating snapshot: $SNAPSHOT_NAME"
lvcreate -L 5G -s -n "$SNAPSHOT_NAME" "$VOLUME"

# Clean old snapshots (keep only recent ones)
OLD_SNAPSHOTS=$(lvs --noheadings -o lv_name | grep "$SNAPSHOT_PREFIX" | head -n -$MAX_SNAPSHOTS)
for snapshot in $OLD_SNAPSHOTS; do
    echo "Removing old snapshot: $snapshot"
    lvremove -f "/dev/webserver-vg/$snapshot"
done

# Cron entry: Create snapshots before each backup
# 0 2 * * * /usr/local/bin/snapshot-backup.sh
RAID: Redundancy and Performance
Understanding RAID Levels
| RAID Level | Min Disks | Redundancy | Performance | Use Case | |------------|-----------|------------|-------------|----------| | RAID 0 | 2 | None | High read/write | Temp files, cache | | RAID 1 | 2 | Mirror | Good read | Boot drives, critical data | | RAID 5 | 3 | Single disk failure | Good read, fair write | General purpose | | RAID 6 | 4 | Two disk failures | Good read, slow write | Large storage arrays | | RAID 10 | 4 | Multiple failures | Excellent | High-performance databases |
Setting Up Software RAID
RAID 1 for Boot Drive Redundancy
Scenario: Ensuring your server can boot even if one drive fails.
# Check available disks
lsblk

# Create RAID 1 array with two 100GB drives
sudo mdadm --create --verbose /dev/md0 \
    --level=1 \
    --raid-devices=2 \
    /dev/sdb /dev/sdc

# Check RAID status
cat /proc/mdstat
# md0 : active raid1 sdc[1] sdb[0]
#       104320 blocks super 1.2 [2/2] [UU]

# Create filesystem and mount
sudo mkfs.ext4 /dev/md0
sudo mkdir /raid-mirror
sudo mount /dev/md0 /raid-mirror

# Save RAID configuration
sudo mdadm --detail --scan >> /etc/mdadm/mdadm.conf
RAID 5 for Large Storage Array
Scenario: Building a file server with good capacity and redundancy.
# Create RAID 5 with 4 drives (3 for data, 1 for parity)
sudo mdadm --create --verbose /dev/md1 \
    --level=5 \
    --raid-devices=4 \
    /dev/sdd /dev/sde /dev/sdf /dev/sdg

# Monitor rebuild process (takes time!)
watch cat /proc/mdstat

# Once complete, create LVM on top of RAID
sudo pvcreate /dev/md1
sudo vgcreate fileserver-vg /dev/md1
sudo lvcreate -L 500G -n shared-data fileserver-vg

# Create filesystem optimized for large files
sudo mkfs.xfs -f /dev/fileserver-vg/shared-data
sudo mount /dev/fileserver-vg/shared-data /shared
RAID Monitoring and Maintenance
Monitoring RAID Health
# Check RAID status
sudo mdadm --detail /dev/md0

# Monitor for failures
sudo mdadm --monitor --daemonise --mail=admin@company.com /dev/md0 /dev/md1

# Check for bad blocks
sudo badblocks -v /dev/sdb
Handling Drive Failures
# Simulate drive failure for testing
sudo mdadm --manage /dev/md0 --fail /dev/sdb

# Check status (should show degraded)
cat /proc/mdstat

# Remove failed drive
sudo mdadm --manage /dev/md0 --remove /dev/sdb

# Add replacement drive
sudo mdadm --manage /dev/md0 --add /dev/sdh

# Monitor rebuild
watch cat /proc/mdstat
Filesystem Optimization
Choosing the Right Filesystem
Filesystem Comparison
| Filesystem | Best For | Max File Size | Max Volume Size | Special Features | |------------|----------|---------------|-----------------|------------------| | ext4 | General use, compatibility | 16TB | 1EB | Mature, reliable | | XFS | Large files, databases | 8EB | 8EB | High performance | | Btrfs | Advanced features | 16EB | 16EB | Snapshots, compression | | ZFS | Enterprise storage | 16EB | 256ZB | Checksums, deduplication |
Real-World Filesystem Selection
# Database server - XFS for performance
sudo mkfs.xfs -f -d agcount=8 /dev/mapper/db-data

# Web server - ext4 for compatibility
sudo mkfs.ext4 -T largefile /dev/mapper/web-files

# Backup storage - Btrfs for compression
sudo mkfs.btrfs -d single -m dup /dev/mapper/backup-storage
Performance Optimization Techniques
Mount Options for Performance
# High-performance database mount
/dev/mapper/db-data /var/lib/mysql xfs defaults,noatime,nodiratime,logbufs=8,logbsize=32k 0 2

# Web server with many small files
/dev/mapper/web-files /var/www ext4 defaults,noatime,data=ordered,barrier=0 0 2

# Log filesystem with frequent writes
/dev/mapper/log-files /var/log ext4 defaults,noatime,data=writeback,commit=60 0 2
Filesystem Tuning
# Optimize ext4 for databases
sudo tune2fs -o journal_data_writeback /dev/mapper/db-volume
sudo tune2fs -O ^has_journal /dev/mapper/db-volume  # Remove journal for raw performance

# Set reserved space for root (5% default is too much for large volumes)
sudo tune2fs -m 1 /dev/mapper/large-volume  # Set to 1% instead of 5%

# Optimize XFS for large files
sudo xfs_db -c "frag -f" /dev/mapper/xfs-volume  # Check fragmentation
sudo xfs_fsr /mount/point  # Defragment if needed
Advanced Storage Scenarios
Scenario 1: High-Performance Database Server
#!/bin/bash
# setup-db-storage.sh - Optimized database storage setup

# Create RAID 10 for maximum performance and redundancy
mdadm --create /dev/md0 --level=10 --raid-devices=4 /dev/sd{b,c,d,e}

# Setup LVM
pvcreate /dev/md0
vgcreate mysql-vg /dev/md0

# Separate logical volumes for different database components
lvcreate -L 100G -n mysql-data mysql-vg
lvcreate -L 50G -n mysql-logs mysql-vg
lvcreate -L 20G -n mysql-tmp mysql-vg

# Optimize filesystems for database workload
mkfs.xfs -f -d agcount=8 -l size=128m /dev/mysql-vg/mysql-data
mkfs.xfs -f /dev/mysql-vg/mysql-logs
mkfs.ext4 -T largefile /dev/mysql-vg/mysql-tmp

# Mount with performance options
mkdir -p /var/lib/mysql/{data,logs,tmp}
echo '/dev/mysql-vg/mysql-data /var/lib/mysql/data xfs defaults,noatime,nodiratime,logbufs=8,logbsize=32k,inode64 0 2' >> /etc/fstab
echo '/dev/mysql-vg/mysql-logs /var/lib/mysql/logs xfs defaults,noatime,nodiratime 0 2' >> /etc/fstab
echo '/dev/mysql-vg/mysql-tmp /var/lib/mysql/tmp ext4 defaults,noatime 0 2' >> /etc/fstab

mount -a
Scenario 2: Development Environment with Snapshots
#!/bin/bash
# setup-dev-environment.sh - Development server with snapshot capabilities

# Create volume group
vgcreate dev-vg /dev/sdb /dev/sdc

# Create base logical volumes
lvcreate -L 20G -n dev-web dev-vg
lvcreate -L 30G -n dev-db dev-vg
lvcreate -L 10G -n dev-cache dev-vg

# Setup filesystems
mkfs.ext4 /dev/dev-vg/dev-web
mkfs.ext4 /dev/dev-vg/dev-db
mkfs.ext4 /dev/dev-vg/dev-cache

# Mount points
mkdir -p /dev-env/{web,database,cache}
mount /dev/dev-vg/dev-web /dev-env/web
mount /dev/dev-vg/dev-db /dev-env/database
mount /dev/dev-vg/dev-cache /dev-env/cache

# Snapshot script for testing
cat > /usr/local/bin/dev-snapshot.sh << 'EOF'
#!/bin/bash
SNAPSHOT_NAME="dev-snapshot-$(date +%Y%m%d-%H%M%S)"

echo "Creating development snapshot: $SNAPSHOT_NAME"
lvcreate -L 5G -s -n "web-$SNAPSHOT_NAME" /dev/dev-vg/dev-web
lvcreate -L 10G -s -n "db-$SNAPSHOT_NAME" /dev/dev-vg/dev-db

echo "Snapshot created. To rollback:"
echo "umount /dev-env/web /dev-env/database"
echo "lvconvert --merge /dev/dev-vg/web-$SNAPSHOT_NAME"
echo "lvconvert --merge /dev/dev-vg/db-$SNAPSHOT_NAME"
echo "mount /dev/dev-vg/dev-web /dev-env/web"
echo "mount /dev/dev-vg/dev-db /dev-env/database"
EOF

chmod +x /usr/local/bin/dev-snapshot.sh
Monitoring and Maintenance
Storage Health Monitoring
Comprehensive Monitoring Script
#!/bin/bash
# storage-health-check.sh - Complete storage system monitoring

LOG_FILE="/var/log/storage-health.log"
ALERT_EMAIL="admin@company.com"

log_message() {
    echo "[$(date)] $1" | tee -a "$LOG_FILE"
}

check_raid_health() {
    log_message "=== RAID Health Check ==="

    for md_device in $(ls /dev/md* 2>/dev/null); do
        if [[ -b "$md_device" ]]; then
            status=$(cat /proc/mdstat | grep "$(basename $md_device)" | grep -o '\[.*\]')
            if [[ "$status" =~ "_" ]]; then
                log_message "ALERT: $md_device is degraded: $status"
                echo "RAID $md_device is degraded" | mail -s "RAID Alert" "$ALERT_EMAIL"
            else
                log_message "OK: $md_device is healthy: $status"
            fi
        fi
    done
}

check_lvm_health() {
    log_message "=== LVM Health Check ==="

    # Check volume group space
    vgs --noheadings --units g | while read vg_info; do
        vg_name=$(echo "$vg_info" | awk '{print $1}')
        vg_free=$(echo "$vg_info" | awk '{print $7}' | sed 's/g//')

        if (( $(echo "$vg_free < 10" | bc -l) )); then
            log_message "ALERT: Volume group $vg_name has less than 10GB free"
            echo "Volume group $vg_name is running low on space" | mail -s "Storage Alert" "$ALERT_EMAIL"
        else
            log_message "OK: Volume group $vg_name has ${vg_free}GB free"
        fi
    done
}

check_filesystem_usage() {
    log_message "=== Filesystem Usage Check ==="

    df -h | tail -n +2 | while read line; do
        usage=$(echo "$line" | awk '{print $5}' | sed 's/%//')
        filesystem=$(echo "$line" | awk '{print $1}')
        mountpoint=$(echo "$line" | awk '{print $6}')

        if [[ "$usage" -gt 90 ]]; then
            log_message "ALERT: $mountpoint is ${usage}% full"
            echo "Filesystem $mountpoint ($filesystem) is ${usage}% full" | mail -s "Disk Space Alert" "$ALERT_EMAIL"
        elif [[ "$usage" -gt 80 ]]; then
            log_message "WARNING: $mountpoint is ${usage}% full"
        else
            log_message "OK: $mountpoint is ${usage}% full"
        fi
    done
}

check_disk_errors() {
    log_message "=== Disk Error Check ==="

    for device in $(lsblk -dno NAME | grep -E '^sd|^nvme'); do
        if command -v smartctl >/dev/null; then
            error_count=$(smartctl -A "/dev/$device" 2>/dev/null | grep "Raw_Read_Error_Rate\|Reallocated_Sector_Ct" | awk '{sum += $10} END {print sum+0}')
            if [[ "$error_count" -gt 0 ]]; then
                log_message "ALERT: /dev/$device has $error_count disk errors"
                echo "Disk /dev/$device has errors" | mail -s "Disk Error Alert" "$ALERT_EMAIL"
            else
                log_message "OK: /dev/$device has no errors"
            fi
        fi
    done
}

# Run all checks
log_message "Starting storage health check..."
check_raid_health
check_lvm_health
check_filesystem_usage
check_disk_errors
log_message "Storage health check completed."

# Schedule with cron:
# 0 */6 * * * /usr/local/bin/storage-health-check.sh
Performance Monitoring
#!/bin/bash
# storage-performance-monitor.sh - Monitor storage performance

# Check I/O statistics
iostat -x 1 5 | grep -E "(Device|sd|md|dm-)" | tail -20

# Check for I/O wait
sar -u 1 5 | grep -E "(Average|%iowait)"

# Monitor specific logical volumes
lvs -o +lv_read_ahead,lv_kernel_cache_policy

# Check filesystem fragmentation (ext4)
for fs in $(mount | grep ext4 | awk '{print $1}'); do
    echo "Fragmentation for $fs:"
    e4defrag -c "$fs" 2>/dev/null || echo "Unable to check $fs"
done
Troubleshooting Common Issues
Issue 1: Volume Group Not Found
# Problem: VG not found after reboot
# Solution: Scan for volume groups
sudo vgscan
sudo vgchange -ay

# Make sure LVM volumes are activated at boot
sudo systemctl enable lvm2-monitor
Issue 2: Cannot Extend Logical Volume
# Problem: No space left in volume group
# Check VG space
sudo vgdisplay

# Solution 1: Add new physical volume
sudo pvcreate /dev/sdx
sudo vgextend existing-vg /dev/sdx

# Solution 2: Reduce other logical volumes
sudo umount /mount/point
sudo e2fsck -f /dev/vg/lv-to-reduce
sudo resize2fs /dev/vg/lv-to-reduce 10G
sudo lvreduce -L 10G /dev/vg/lv-to-reduce
sudo mount /dev/vg/lv-to-reduce /mount/point
Issue 3: RAID Array Degraded
# Check RAID status
cat /proc/mdstat

# If disk failed, replace it
sudo mdadm --manage /dev/md0 --remove /dev/sdb
sudo mdadm --manage /dev/md0 --add /dev/sdx

# Force reassemble if array won't start
sudo mdadm --assemble --force /dev/md0 /dev/sdb /dev/sdc
Issue 4: Poor Storage Performance
# Check for I/O bottlenecks
iotop -a  # Show accumulated I/O

# Check mount options
mount | grep "type ext4\|type xfs"

# Test disk performance
sudo hdparm -tT /dev/sda

# Test filesystem performance
dd if=/dev/zero of=/tmp/testfile bs=1M count=1000 oflag=direct
Best Practices and Security
Storage Security Best Practices
1. Encrypt sensitive data:
# LUKS encryption
sudo cryptsetup luksFormat /dev/sdb
sudo cryptsetup luksOpen /dev/sdb encrypted-disk
sudo pvcreate /dev/mapper/encrypted-disk
2. Regular backups:
# LVM snapshot backup
sudo lvcreate -L 10G -s -n backup-snapshot /dev/vg/original
sudo dd if=/dev/vg/backup-snapshot of=/backup/snapshot.img
sudo lvremove /dev/vg/backup-snapshot
3. Access controls:
# Set proper permissions on mount points
sudo chown -R mysql:mysql /var/lib/mysql
sudo chmod 750 /var/lib/mysql
Capacity Planning
#!/bin/bash
# capacity-planning.sh - Predict storage needs

# Analyze growth trends
df -h | grep -v tmpfs | while read line; do
    mountpoint=$(echo "$line" | awk '{print $6}')
    if [[ -f "/var/log/df-history.log" ]]; then
        echo "Growth trend for $mountpoint:"
        grep "$mountpoint" /var/log/df-history.log | tail -30 | awk '{print $5}' | \
        sed 's/%//' | awk '{sum+=$1} END {if(NR>1) print "Average growth: " (sum/NR) "%"}'
    fi
done

# Log current usage for trend analysis
df -h >> /var/log/df-history-$(date +%Y%m).log
Conclusion: Building Robust Storage Infrastructure
We've journeyed through the comprehensive world of Linux storage management, from basic LVM concepts to advanced RAID configurations and filesystem optimization. Here's your roadmap to storage mastery:
Immediate Actions (This Week)
1. Assess current storage: Run lsblk, df -h, and mount to understand your current setup
2. Plan LVM migration: Identify systems that would benefit from LVM flexibility
3. Implement monitoring: Set up basic storage health checks
4. Test snapshot procedures: Practice creating and restoring LVM snapshots
Short-term Goals (This Month)
1. Implement LVM: Convert existing systems to LVM where beneficial 2. Set up RAID: Add redundancy to critical systems 3. Optimize filesystems: Review and optimize mount options 4. Create backup strategies: Implement automated snapshot-based backups
Advanced Mastery (Next 3-6 Months)
1. Performance tuning: Deep dive into I/O optimization 2. Advanced RAID: Explore RAID 6, nested RAID levels 3. Modern filesystems: Experiment with Btrfs and ZFS 4. Storage automation: Implement Infrastructure as Code for storage
Storage Management Principles
🎯 Plan for Growth: Always design storage systems with 3x expected growth 🔄 Embrace Flexibility: LVM's dynamic allocation saves time and resources 🛡️ Redundancy is Key: Critical data should survive multiple drive failures 📊 Monitor Continuously: Storage problems are easier to prevent than fix 🔒 Security First: Encrypt sensitive data and control access properly
Final Thoughts
Modern storage management isn't just about keeping data safe—it's about creating flexible, scalable infrastructure that adapts to changing needs. The techniques we've covered transform rigid storage into dynamic resources that grow, shrink, and protect your data automatically.
Remember: The best storage system is one you never have to think about because it handles growth, failures, and performance demands transparently. Start with LVM for flexibility, add RAID for redundancy, optimize filesystems for performance, and monitor everything continuously.
Your future self (and your 2 AM crisis calls) will thank you for building storage systems that work reliably, scale effortlessly, and protect data automatically.
---
🚀 Continue Your Linux Journey
This is Part 18 of our comprehensive Linux mastery series.
Previous: Firewall Security: iptables vs ufw vs firewalld - Master network security and protection
Next: Performance Monitoring & Optimization - Master system performance analysis and tuning
📚 Complete Linux Series Navigation
Advanced Mastery:
Storage Mastered? Complete your Linux expertise with performance monitoring and optimization!
🔗 Related Storage Topics
How has this storage management guide helped clarify LVM, RAID, and filesystem concepts for you? What storage challenges are you facing in your environment? Share your experiences—storage expertise grows through shared knowledge and real-world problem-solving.